A tutorial on how to add a custom Remote Console (RCON) command to a mod.
Prerequisites[]
Before you get started, here are some things you should already know.
- Be familiar with Modding, have the dev kit installed and know how to create basic working mods.
- Be familiar with Rcon. Have a working Rcon client that you know how to use which allows you to send arbitrary commands that you can type out manually.
- Have at least some amount of experience working with Unreal blueprints.
Setup[]
We need to enable Rcon in the dev kit so that we will be able to test our work.
A. Edit Game.ini[]
Before starting the dev kit, we need to edit the file %localappdata%\ConanSandbox\Saved\Config\Windows\Game.ini with a text editor such as notepad. (Note: %localappdata% usually expands to something like C:\Users\your_name\AppData\Local.) Add the following section to this file, substituting any port and password you would like.
[RconPlugin]
RconEnabled=1
RconPort=25575
RconPassword=test
Save the file.
Note: The file will only exist if you have run the dev kit at least once in the past.
Note: Make sure to remember the port and password you choose.
B. Start a mod[]
Start up the dev kit and choose the mod you want to add Rcon commands to. For the purpose of this document, we will assume you are creating a new, empty mod, but you could also add to an existing mod if you prefer.
Choose any name you like for your mod. We will be calling ours ExampleRcon.
C. Enable dedicated server[]
Rcon only works on dedicated servers. You need to configure the dev kit to run a dedicated server while playing from the editor if you want to be able to test your Rcon commands.
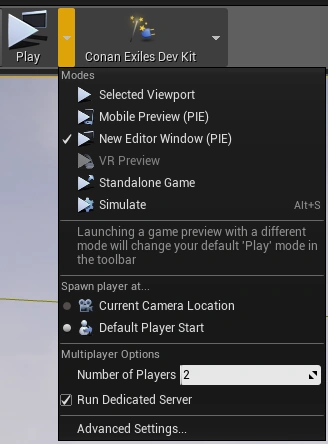
In the toolbar of the dev kit, you should see a "Play" button which you should be familiar with. Next to this button is a small down arrow you can click to open a menu. In this menu, set the following options:
- Required: Select "New Editor Window (PIE)". "Selected Viewport" can also work if you prefer. Do not use any of the other modes.
- Recommended: Set "Number of Players" to 2 or more. You can test with only 1, but often hard to tell if things are working correctly that way.
- Required: Check "Run Dedicated Server"
D. Verify Setup[]
Press the play button to launch PIE (Play In Editor) and wait for it to startup. You should be able to create a character or play an existing one. If there are any errors or issues getting the game to play, go and resolve those before continuing.
Next, run your chosen Rcon client and tell it to connect. The address you want to connect to is 127.0.0.1:25575. Substitute the port number that you specified in your Game.ini in Step A. Use the password you specified in your Game.ini.
If your client fails to connect:
- Verify the port and password you are using match your Game.cfg and that you are using the address
127.0.0.1(local loopback). - Verify that your play menu settings match what is described above, especially "Run Dedicated Server".
- Make sure you edited your Game.cfg while the dev kit was closed. If not, then close the dev kit and go edit it again. Then, restart the dev kit.
- You may be using an incompatible Rcon client. At the time of this writing, mcrcon 0.0.5 works. Later versions of mcrcon do not work. Status of other clients is unknown.
- In some unusual cases, you may have have a firewall or security software preventing the connection. Such is outside the scope of this document.
Once connected, run the command help. You should see it print a list of available commands. If this works, then setup is complete!
Implementation[]
Now we are ready to start implementing a command. We will be implementing a simple command called notify which sends a brief message to all connected players using the existing HUD notification system. (In real mod, you would want to build a custom UI for the notifications, but that is outside the scope of this document.)
Create Assets[]
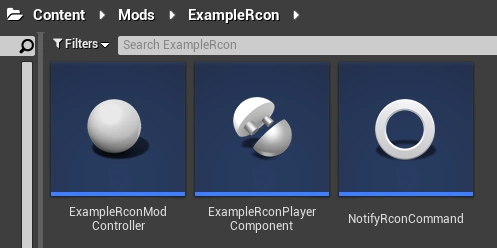
The first thing we need to do is create some assets. All of these should be created inside your mod folder. For our mod, that means Content/Mods/ExampleRcon.
Mod Controller[]
Create a new blueprint class. Search for and choose ModController as the base class. Then name your blueprint. We will name ours ExampleRconModController.
Actor Component[]
Create a new blueprint class. Select ActorComponent as the base class. We will name ours ExampleRconPlayerComponent.
Rcon Command[]
Create a new blueprint class. Select RconCommandObject as the base class. We will name ours NotifyRconCommand.
Save[]
Save all of the assets. You should now have something like this in your content browser.
ExampleRconPlayerComponent[]
We will implement the player component first. This component will be attached to every player controller and serve as a way to display our notification.
Properties[]
We want our component to replicate so that we can call a client event from the server. We also want to disable ticking because we don't need it.
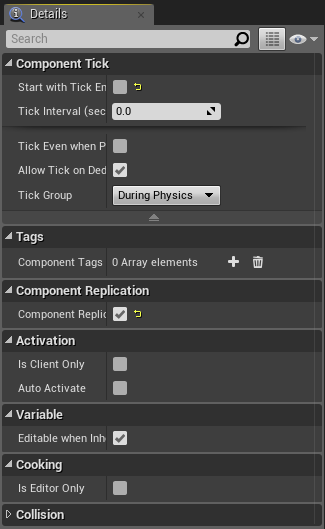
Note: Press the "Class Defaults" toolbar button to open the class properties if necessary.
Event Graph[]
Now, let's create our event graph. Feel free to delete the BeginPlay and Tick event nodes if you want to. We won't need them.
We need two custom events, which can be created by right-clicking and choosing "Add Custom Event...".
- Name the first event
ShowNotification. Select it and add parameter named "Message" of typeText. - Name the second event
ClientShowNotification. Select it and add parameter named "Message" of typeText. Also in the property grid, set "Replicates" to "Run on owning Client" and "Reliable".
Call ClientShowNotification from ShowNotification. Implement ClientShowNotification to get the components owner, which will be a player controller and call the function NotificationText.
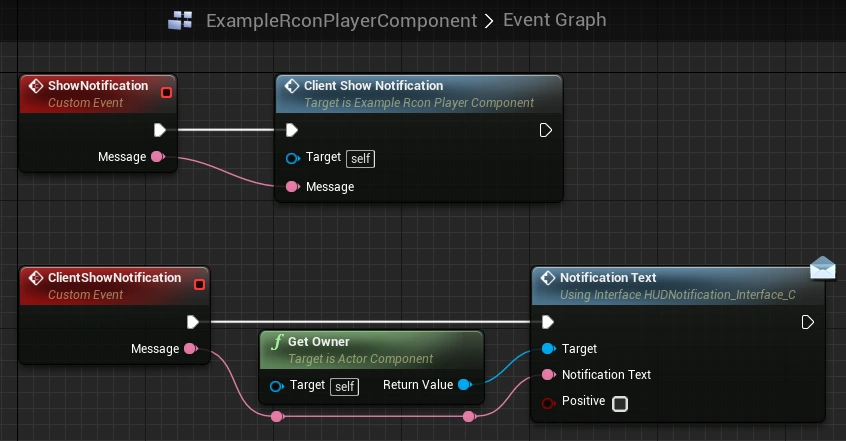
Note: Technically you can call NotificationText from the server and it will replicate for you, making our client event (and technically this whole component) unnecessary. However, in a real mod implementation, you would likely replace the call to NotificationText with a call to show your own custom UI. In such a case, these steps are necessary. So that is why we did them here as an example.
Now save and compile this blueprint.
ExampleRconModController[]
Next we will implement our mod controller.
Properties[]
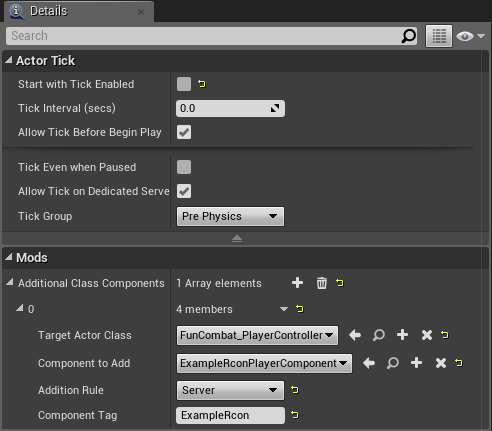
In the class defaults, uncheck "Start with Tick Enabled". We don't need ticking.
Next, let's add our actor component to the array "Additional Class Components". The target class needs to be FunCombat_PlayerController and the addition rule should be "Server". Component tag is optional - we wont be referencing it.
Event Graph[]
The first thing we need to do is create an instance of our Rcon command in our mod controller's BeginPlay and save it to a variable so that it doesn't get destroyed.
- Create a "Construct Object from Class" node wired to "Event BeginPlay".
- Set the class to
NotifyRconCommand(or whatever you named your command). - Create a
GetGameModenode and wire it to the "Outer" pin on the construct node. This is an important step to enable the command to replicate from client to server. - Right click the construct node's "Return Value" pin and choose "Promote to Variable" to create a variable and assign it. Name the variable whatever you want. We named ours
NotifyCommand.
The other thing that this graph needs is an event that our command can call server-side to broadcast the notification to all players.
- Right click and choose "Add Custom Event...". Name the event
BroadcastNotification. - Select the event and add a parameter to it named "Message" of type
Text. - Starting from the event, drag the white line and add a
Get All Actors of Classnode. For the "Actor Class" property, selectFunCombat_PlayerController. - Drag from the output array and create a
ForEachLoopnode. - From the "Array Element" output pin, drag and create a
GetComponentByClassnode (not the pluralGetComponentsByClass). For the "Component Class" property, selectExampleRconPlayerComponent, or whatever you named your component class. - From the "Return Value" output pin, drag and create a
ShowNotificationnode (calling the event we created earlier). - From the starting event node, wire the "Message" output all the way over to the "Message" input on the
ShowNotificationnode. - Connect any missing white lines.
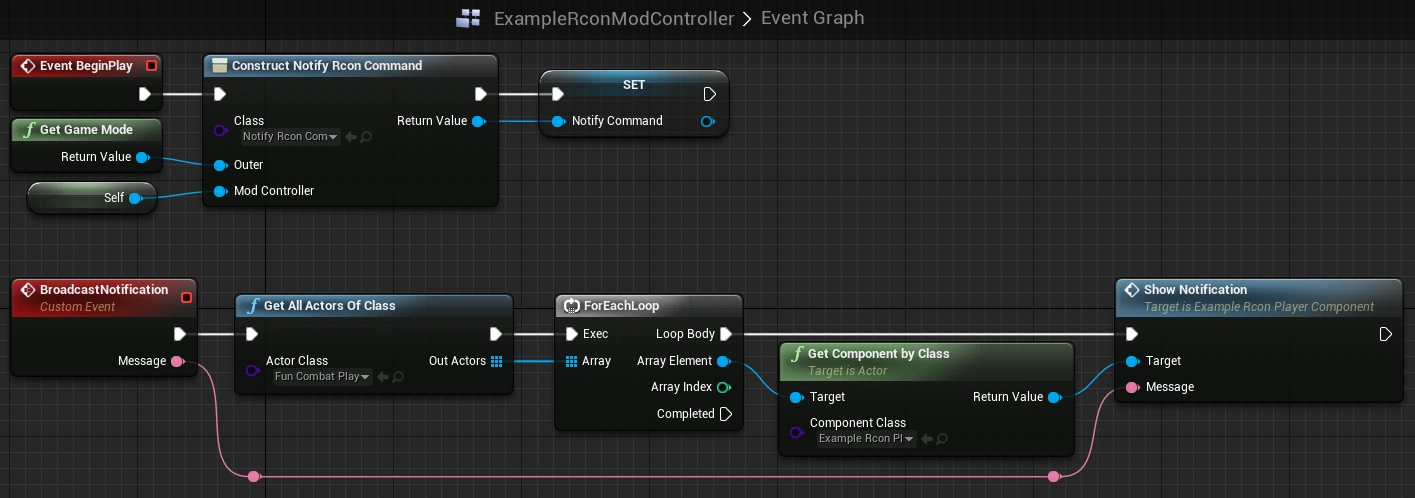
Note: In the image, you can see that the ConstructNotifyRconCommand node has an input pin for a mod controller that you don't have. Don't worry - we will add that next.
NotifyRconCommand[]
The first thing we want to do is add a variable to the blueprint. Call it "ModController" and set its type to ExampleRconModController (or whatever your mod controller is called). Set the properties "Editable" and "Expose on Spawn" to true"
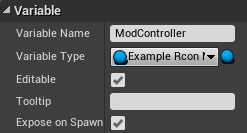
Save and compile the asset.
Back to your mod controller[]
Return to your mod controller asset blueprint. You should now see this new variable as a pin on your "Construct Object" node that you made earlier. As pictured earlier, drag from this input pin and add a "Get a reference to self" or Self node.
Save and compile your mod controller.
Now back to your Rcon command[]
Now that there is something for the command to do, let's implement it!
Properties[]
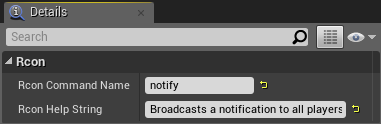
In the class defaults, set "Rcon Command Name" to notify. This is the actual text you will type in your Rcon client to trigger the command. For "Rcon Help String", enter text that you want to show up when someone enters the help command in the Rcon client.
Event Graph[]
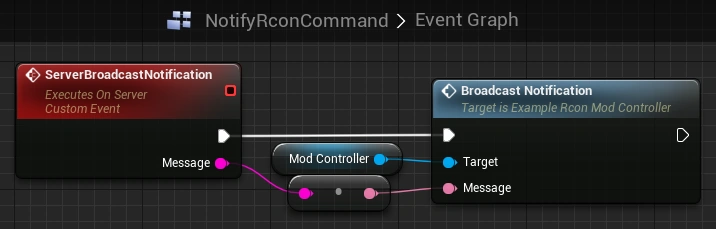
Rcon commands come in client side. We need to replicate to the server before we can do anything useful.
- Add a custom event to the graph. Name it
ServerBroadcastNotification. Select it and add a parameter called "Message" of typeString. Also, set "Replicates" to "Run on Server" and "Reliable". - Grab the "ModController" variable that we created earlier and add a getter for it. Drag from there and add a call to
BroadcastNotification. - Connect the incoming message to the
BroadcastNotificationnode, converting it fromStringtoTextin the process. - Connect the white line.
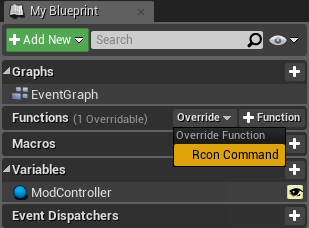
RconCommand Function[]
Go the function list in the blueprint, click the "Override" button and select "Rcon Command" to override the RconCommand function. This is the function that gets called client side when the command first arrives from your external Rcon client.
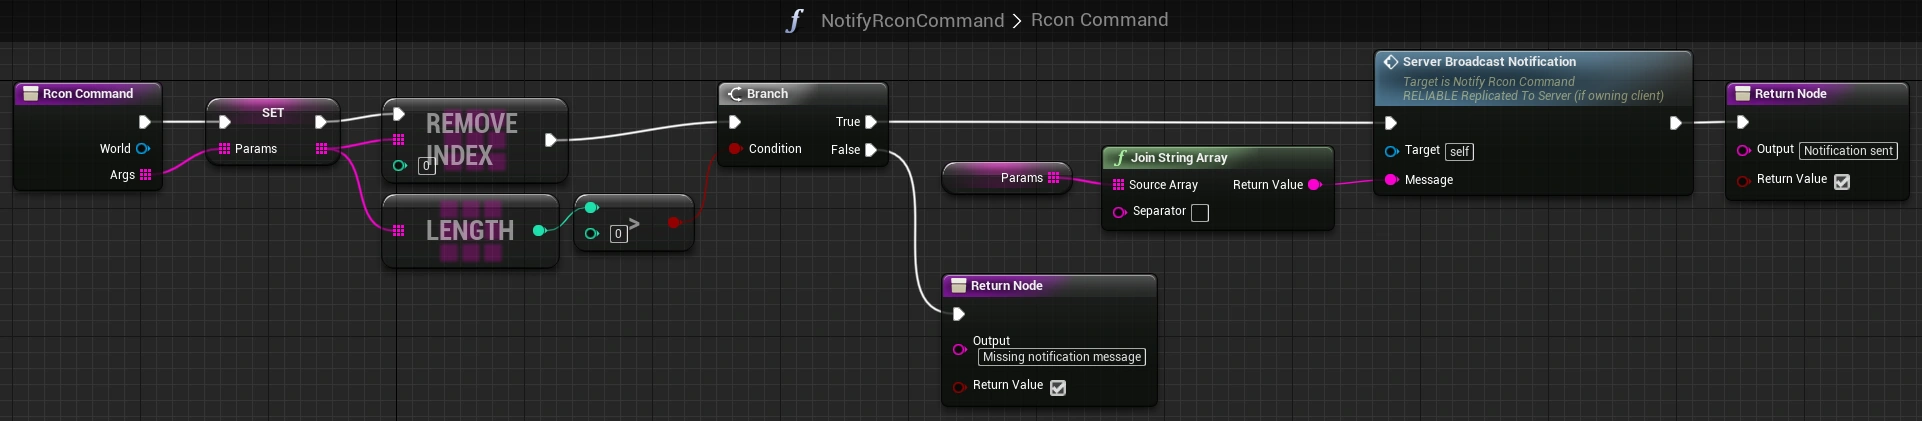
Now let's implement the function. The first thing to note is that the parameters are passed in as an array. The original string is split on every whitespace. The first entry in the array is always the command itself. For our case, we want to skip the first entry (command name) and combine the rest of the entries back into a single string that we can pass along to our notification system. There are many ways to do this; we will just pick one.
- Right click the "Args" output pin from the starting node and select "Promote to Local Variable". Name the variable "Params".
- From the setter node that was created, drag the output pin and create a
RemoveIndexnode. Leave the index set to 0. - Also from the setter output, drag and create a
Lengthnode. - From the
Lengthnode, drag and create a "integer > integer", or>, node. - From the
>node, create aBranchnode. We are verifying that a message was actually entered after the command before we proceed to broadcast it. - From the "False" output of the branch, wire in a "Return" node. Set the "Output" property to print an error back to the Rcon client so the user knows what they did wrong. I do not know what the "Return Value" boolean property does.
- From the "True" output of the branch, wire in a call to the
ServerBroadcastNotitificationevent we added tot he event graph. - Add a getter for the "Params" local variable, wire that into a
JoinStringArraynode. Set the "Separator" property to a single space. - From the
JoinStringArraynode, connect to the output to the "Message" input on theServerBroadcastNotitificationnode. - Wire the output of the
ServerBroadcastNotitificationnode to a separate "Return" node. This time set the "Output" property to a confirmation message to let the user of the Rcon client know the command was processed.
Save and compile all blueprints and you should be done.
Testing[]
Let's see if it all works!
- Press the play button and wait for PIE (Play in Editor) to launch.
- Startup your external Rcon client and connect to the running PIE instance.
- In your Rcon client, enter the command
help. Look through the output and you should see your newnotifycommand listed. - Now enter the command
notifywith no parameters and you should see the error message you set up. - Next enter the command
notify Hi there!. You should see the message show up on screen in all PIE windows as a HUD notification (upper right of screen).

If it doesn't work, go back over everything and try to figure out what you missed.
Rcon Details and Limitations[]
It is important to note that there are limitations to what you can do in an RconCommand function blueprint. This function runs in its own special limited non-graphical client. A lot of nodes will not be available inside this function and some operations are not valid and can even crash the game.
For example, if you want to use the PrintString node in your RconCommand function, you must uncheck the "Print to Screen" box. There is no screen to print to and attempting to do so crashes the dev kit. You can still print to the log and view it in the output window, as long as you don't try to print to the screen.
Because the RconCommand function runs in a limited client environment, all you should be doing in that function is parsing input and passing things along to a server-side function to do all the real work. In order to be able to call a server-side function from your RconCommand function, you need to have proper client ownership setup. This is why when you construct the instance of your command blueprint, you pass the game mode as the "Outer" a.k.a. the owner.
Once you are server side, you now have full access to things and can do whatever it is you need to do.
Question: If I can only access things server side, how can I return information back to the external Rcon client?[]
Since the internal Rcon "client" behaves similar to regular game client (with restrictions), you can add a "Run on owning client" event to your RconCommandObject's event graph and call if from the server, passing along whatever information you need. You can then store that information in client-side variables in your blueprint that can be accessed the next time your command is run. This does mean that the information needs to be stored before the command actually runs because the RconCommand function cannot stop and wait for a call to the server and back before returning.