(→DevKit) Tag: Visual edit |
m (→DevKit: 168GB ->~270GB) Tag: Visual edit |
||
| (15 intermediate revisions by 6 users not shown) | |||
| Line 1: | Line 1: | ||
:''See also: [[Guide#Modding]], [[Modding/Useful links]].'' |
:''See also: [[Guide#Modding]], [[Modding/Useful links]].'' |
||
:''See also - mods: [[Mod:Age of Calamitous]], [[Mod:Emberlight]], [[Mod:WARRIOR Mutator for Conan Exiles]].'' |
:''See also - mods: [[Mod:Age of Calamitous]], [[Mod:Emberlight]], [[Mod:WARRIOR Mutator for Conan Exiles]].'' |
||
| − | ''[[{{Gamename}}]]'' features full '''modding''' support on PC. This was made available at the start of [[Early Access]]. Mod developers are able to download a custom [[ |
+ | ''[[{{Gamename}}]]'' features full '''modding''' support on PC. This was made available at the start of [[Early Access]]. Mod developers are able to download a custom [[{{Gamename}}#Technical|Unreal Engine]] editor, letting them create a whole host of modifications to the game. Everything from changing aspects of gameplay to adding new [[creature|monsters]] and [[item]]s to the game can be done with the modding tools. A mod management tool which connects to the Steam Workshop allows players to easily load in the mods they want to play with.<ref>[https://www.conanexiles.com/blog/dev-blog-8-servers-mods/ Dev Blog 8]</ref> |
==Mods for Conan Exiles== |
==Mods for Conan Exiles== |
||
| Line 11: | Line 11: | ||
===Mods - Short Version=== |
===Mods - Short Version=== |
||
| − | A mod in |
+ | A mod in ''{{Gamename}}'' is a single .pak (archive) file containing modified versions of game assets and optionally new assets. |
To create mods, get the DevKit from the Epic Games Launcher, do your changes and build the mod to generate a mod file. You can either distribute the mod through the Steam Workshop by uploading it from the DevKit, or simply share the file with your friends directly. |
To create mods, get the DevKit from the Epic Games Launcher, do your changes and build the mod to generate a mod file. You can either distribute the mod through the Steam Workshop by uploading it from the DevKit, or simply share the file with your friends directly. |
||
===Installing Mods=== |
===Installing Mods=== |
||
| − | The easiest way to install mods is to subscribe to them on the Steam Workshop. Once they are downloaded you can find them in the "Mods" menu from the Main Menu in |
+ | The easiest way to install mods is to subscribe to them on the Steam Workshop. Once they are downloaded you can find them in the "Mods" menu from the Main Menu in-game. You can also use mods that you get outside of the Steam Workshop - put the mod .pak file in "<code><SteamLibrary>\steamapps\common\Conan Exiles\ConanSandbox\Mods</code>" and it will be available in the in-game mods menu. |
'''Note:''' You have to restart the game before changes to the selected mod list has any effect. The ingame gui doesn't make this very clear right now. |
'''Note:''' You have to restart the game before changes to the selected mod list has any effect. The ingame gui doesn't make this very clear right now. |
||
| Line 26: | Line 26: | ||
'''The simple version:''' Automatic downloading of mods allows you to join a server without having to find and subscribe to every mod first. |
'''The simple version:''' Automatic downloading of mods allows you to join a server without having to find and subscribe to every mod first. |
||
| − | '''The full explanation:''' When you join a modded server without having subscribed to their mods first, the game will give you a list of which mods you are not subscribed to with an option at the bottom to download and enable all missing mods. |
+ | '''The full explanation:''' When you join a modded server without having subscribed to their mods first, the game will give you a list of which mods you are not subscribed to with an option at the bottom to download and enable all missing mods. Bear in mind doing so will require the game to restart and the game takes a long time to start up if you're using a lot of mods. |
Non-Steam mods are shown in the list, but you will have to get their correct version manually.<ref>[https://discordapp.com/channels/271779596670730240/273869701912985601/517426573251444736 Vodi#3191, CE Modding discord - November 28, 2018]</ref> |
Non-Steam mods are shown in the list, but you will have to get their correct version manually.<ref>[https://discordapp.com/channels/271779596670730240/273869701912985601/517426573251444736 Vodi#3191, CE Modding discord - November 28, 2018]</ref> |
||
| − | There are also two checkboxes, one to automatically subscribe to / update mods when needed |
+ | There are also two checkboxes, one to automatically subscribe to / update mods when needed and one to automatically connect when ready. These may be changed from ''Settings > Gameplay'':<ref>[https://forums.funcom.com/t/auto-download-of-mods/45481 "Auto download of Mods" stinger, Funcom Forums - November 23, 2018]; ADoM settings found in TestLive.</ref><ref>CE Modding discord (in #general) - November 23, 2018</ref><gallery widths="200px" mode="nolines"> |
File:ADoM settings.PNG|The two bottom settings toggle the Automatic Downloading of Mods' aspects. |
File:ADoM settings.PNG|The two bottom settings toggle the Automatic Downloading of Mods' aspects. |
||
File:ADoM display1.PNG|Mod Mismatch section seen when selecting a server on the server list. |
File:ADoM display1.PNG|Mod Mismatch section seen when selecting a server on the server list. |
||
| Line 48: | Line 48: | ||
===Mod compatibility=== |
===Mod compatibility=== |
||
| − | '''Mod compatibility''' depends on the nature of code changes done in patches. |
+ | '''Mod compatibility''' depends on the nature of code changes done in patches. Players and server admins who use mods may experience compatibility issues when trying to play the game immediately after a new patch. These can be anything from not being able to access a chosen server to placeables disappearing and the game crashing on start-up. It could even result in world corruption! To be safe, don't launch your server until you've updated every mod possible and/or tried them in singleplayer, where it's not so much of an issue if the world gets corrupted. |
| − | To fix these compatibility issues the developers have to release a new DevKit so the mod creators can update their mods. |
+ | To fix these compatibility issues the developers have to release a new DevKit so the mod creators can update their mods. They try to have a new DevKit ready as quickly as they can after rolling out a patch and they are usually able to release it no later than 24 hours after the patch came out. Having a DevKit ready when a patch is fresh causes less downtime for modded servers and players. |
| − | Since the developers cannot always guarantee that existing mods will be compatible with a new version of the game, they are recommending that you disable mods if you encounter an issue right after a patch has gone out. |
+ | Since the developers cannot always guarantee that existing mods will be compatible with a new version of the game, they are recommending that you disable mods if you encounter an issue right after a patch has gone out. That way you can confirm that an issue is caused by an incompatible mod or if it is a bug that they have to patch. |
== DevKit == |
== DevKit == |
||
| − | get the |
+ | You can get the '''DevKit''' (~270 GB) itself from either the |
| + | * [https://www.epicgames.com/store/en-US/product/conan-exiles/modkit Epic Games Store] (has to be reverted to the UE version ''{{Gamename}}'' is on.) |
||
| ⚫ | |||
| + | ** Downloading it directly from [https://www.unrealengine.com/download their site]. |
||
| + | ** "Purchasing" it (it's free) with an Epic Games account and installing it from the [https://www.epicgames.com/store/en-US/product/conan-exiles/home store]. |
||
| + | Once purchased from the website links above, it will be in the game library, which is hidden by default. Go to settings and uncheck hide game library to find it. |
||
| ⚫ | |||
| ⚫ | |||
| ⚫ | |||
| ⚫ | |||
| + | |||
| ⚫ | |||
===Support=== |
===Support=== |
||
| Line 67: | Line 72: | ||
===Usage=== |
===Usage=== |
||
| − | The first time you launch the DevKit it will open with a default mod selected. |
+ | The first time you launch the DevKit it will open with a default mod selected. You can use this to play around and see how things work, but before you start working on something you want to use or distribute to other people, you'll need to create a new mod with a unique name. See [[#creating_mod|Create new mod]] below for more details. |
| + | <br/> |
||
| − | |||
| − | |||
| − | |||
| − | |||
Note: The folders in "<DevKit folder>/Games/ConanSandbox/Mods/" are used by the DevKit to edit the mod, so deleting a folder here means you can no longer edit that mod. These are the folders you want to have backups of! |
Note: The folders in "<DevKit folder>/Games/ConanSandbox/Mods/" are used by the DevKit to edit the mod, so deleting a folder here means you can no longer edit that mod. These are the folders you want to have backups of! |
||
| − | Editing existing game assets: Modify assets normally. |
+ | Editing existing game assets: Modify assets normally. Note that you can't rename, move, or delete default game assets. |
| − | To create new assets: |
+ | To create new assets: New assets can only be added in "Content/Mods/<mod name>." |
Use "Play in current viewport" to test with the mod content loaded without having to wait for the game itself to load. |
Use "Play in current viewport" to test with the mod content loaded without having to wait for the game itself to load. |
||
===Build errors=== |
===Build errors=== |
||
| − | When building a mod, Unreal will "cook" each asset. |
+ | When building a mod, Unreal will "cook" each asset. This process will fail if the assets contains certain errors (like a Blueprint compiler error). If the build fails, check the output log for the lines saying something like this (should be near the bottom): |
<code>LogModManager: LogInit: Display: Failure - 7 error(s), 10 warning(s)</code> |
<code>LogModManager: LogInit: Display: Failure - 7 error(s), 10 warning(s)</code> |
||
| Line 90: | Line 92: | ||
<code>LogModManager:Error: Error cooking. Cook process returned: 1</code> |
<code>LogModManager:Error: Error cooking. Cook process returned: 1</code> |
||
| − | In this example there are 7 errors that caused the build to fail. The log will say what the errors were in more detail further up. |
+ | In this example there are 7 errors that caused the build to fail. The log will say what the errors were in more detail further up. Fix these and try to build again! |
===Sharing mods=== |
===Sharing mods=== |
||
| − | When you have a mod you want to share with others, you must first '''build''' the mod. |
+ | When you have a mod you want to share with others, you must first '''build''' the mod. Then you can either upload the mod to the Steam Workshop or share the generated .pak file directly with your friends. |
===Conan DevKit menu=== |
===Conan DevKit menu=== |
||
| Line 100: | Line 102: | ||
:* The name you enter here will be used to create a folder: <DevKit folder>/Games/ConanSandbox/Content/Mods/<mod name>. |
:* The name you enter here will be used to create a folder: <DevKit folder>/Games/ConanSandbox/Content/Mods/<mod name>. |
||
| − | :* Any assets you add will end up here, so make sure you choose a unique name to avoid conflicts with other mods. |
+ | :* Any assets you add will end up here, so make sure you choose a unique name to avoid conflicts with other mods. (Especially until we figure out a safe way to rename mods >.<) (Suggestion by Carnaxus: "Save As" funciton?) |
:* You can change the display name of the mod to something more user friendly before building/uploading to Steam, aka if you named your work in progress "bossweaken," you can rename it to show up as "Weaker Bosses" on the Workshop. |
:* You can change the display name of the mod to something more user friendly before building/uploading to Steam, aka if you named your work in progress "bossweaken," you can rename it to show up as "Weaker Bosses" on the Workshop. |
||
| Line 108: | Line 110: | ||
* Author: Name shown as author in the in-game mod menu. |
* Author: Name shown as author in the in-game mod menu. |
||
* Author URL: Shown in the in-game mod menu. |
* Author URL: Shown in the in-game mod menu. |
||
| − | * Version major, minor, build: Show in the in-game mod menu. |
+ | * Version major, minor, build: Show in the in-game mod menu. Please don't go crazy, we don't need to know that your mod is currently in version 0.2.5.rv2.beta.test3. |
* Description: Shown in the in-game mod menu and on the Steam Workshop. Max length is 8000 characters. |
* Description: Shown in the in-game mod menu and on the Steam Workshop. Max length is 8000 characters. |
||
* Change notes: Shown in Change Notes on the Steam Workshop page. |
* Change notes: Shown in Change Notes on the Steam Workshop page. |
||
| − | * Preview image: A .png image that must be less than 1MB. Used on the Steam Workshop page. |
+ | * Preview image: A .png image that must be less than 1MB. Used on the Steam Workshop page. Not necessarily ''required'', but your mod will probably be ignored without at least one image. |
| − | * Build mod: This will cook the mod and package it so it can be used/uploaded to Steam. |
+ | * Build mod: This will cook the mod and package it so it can be used/uploaded to Steam. Building can take a while depending on how complex your mod is (possibly even an hour or longer, [https://xkcd.com/303/ welcome to the world of programming]) |
| − | * The generated .pak file is the only file needed to load the mod. |
+ | * The generated .pak file is the only file needed to load the mod. You can share this with and/or without Steam. |
* Open in File Explorer (or whatever your equivalent is): |
* Open in File Explorer (or whatever your equivalent is): |
||
:* Active mod folder: Opens the local folder of the active mod that the DevKit uses when editing the mod. |
:* Active mod folder: Opens the local folder of the active mod that the DevKit uses when editing the mod. |
||
:* Built mod folder: Opens the folder where the .pak file generated from a build is located. |
:* Built mod folder: Opens the folder where the .pak file generated from a build is located. |
||
| − | * Cook by the book: By default, the DevKit will find and cook each asset modified in the currently active mod individually. |
+ | * Cook by the book: By default, the DevKit will find and cook each asset modified in the currently active mod individually. If "Cook by the book" is checked, it will do a full dependency based cook (but force include all new assets added by the mod) and then pack up cooked versions of the mod's assets. The normal cook will almost always be much faster. |
* Steam file ID: The Steam Workshop item ID used to identify the mod in the Workshop. |
* Steam file ID: The Steam Workshop item ID used to identify the mod in the Workshop. |
||
:* This is automatically managed when uploading to Steam. |
:* This is automatically managed when uploading to Steam. |
||
| − | :* Open workshop page: Opens a browser window with the Workshop page of the current mod. |
+ | :* Open workshop page: Opens a browser window with the Workshop page of the current mod. It might take a few seconds before the page is updated after uploading. It also ''might'' open in Steam instead. |
* Steam visibility: Visibility of the mod in the Steam Workshop. |
* Steam visibility: Visibility of the mod in the Steam Workshop. |
||
:* Public: Visible to everyone. |
:* Public: Visible to everyone. |
||
| − | :* Friends-only: Visible to you, your friends |
+ | :* Friends-only: Visible to you, your friends and Steam admins. |
| − | :* Hidden: Visible to you, Steam admins |
+ | :* Hidden: Visible to you, Steam admins and users marked as creator. |
| − | :*Unlisted: Visible to you but does not show up in search results. |
+ | :* Unlisted: Visible to you but does not show up in search results. Requires you to send a direct link to anyone you want to be able to use the mod. |
| − | * Upload to Steam button: Uploads the current mod to Steam. |
+ | * Upload to Steam button: Uploads the current mod to Steam. You must first have a build of the mod. |
| − | * Update mod info to Steam button: This will only update the info on the Steam page for your mod with the current state of all the textboxes and preview image. |
+ | * Update mod info to Steam button: This will only update the info on the Steam page for your mod with the current state of all the textboxes and preview image. Allows you to update the preview image on Steam and Steam visibility without uploading the whole mod. |
===Steam=== |
===Steam=== |
||
| − | You can upload a mod to Steam through the DevKit so others can subscribe to the mod. |
+ | You can upload a mod to Steam through the DevKit so others can subscribe to the mod. Note that changes made to the mod on the Steam Workshop website will NOT be reflected in the DevKit. This means that changes to name, description, visibility or preview image will be overridden the next time you upload your mod from the DevKit, so make sure you update these field only through the DevKit, or make sure you mirror such changes manually. Changes to the other fields will not be affected. |
<span id=creating_mod></span> |
<span id=creating_mod></span> |
||
| Line 147: | Line 149: | ||
# Hit "Compile" and "Save" for that Blueprint. Repeat for whatever other items you feel like changing (like "Items/Weapons/Torch," "Items/Weapons/RepairHammer," "tems/Weapons/Pickaxe," etc.). |
# Hit "Compile" and "Save" for that Blueprint. Repeat for whatever other items you feel like changing (like "Items/Weapons/Torch," "Items/Weapons/RepairHammer," "tems/Weapons/Pickaxe," etc.). |
||
# To test your mod you can use "Play" from the main window:[[File:HowToCreateNewMod6.png|frameless|800x800px]] |
# To test your mod you can use "Play" from the main window:[[File:HowToCreateNewMod6.png|frameless|800x800px]] |
||
| − | # Once you are done with your mod, go to the DevKit panel. |
+ | # Once you are done with your mod, go to the DevKit panel. See the "DevKit window" section for details on the different fields and buttons: [[File:HowToCreateNewMod7.png|none|thumb|800px|Go to DevKit panel]] |
# Enter the details and select a preview image: [[File:HowToCreateNewMod8.png|none|thumb]] |
# Enter the details and select a preview image: [[File:HowToCreateNewMod8.png|none|thumb]] |
||
| − | # Click the "Build mod" button to build the mod. |
+ | # Click the "Build mod" button to build the mod. This process can take a while depending on how many assets are changed in the mod. |
# Once the build is done, you can either click "Upload mod to Steam" or go to the "Built mod folder" and share the "<modname>.pak" file directly. |
# Once the build is done, you can either click "Upload mod to Steam" or go to the "Built mod folder" and share the "<modname>.pak" file directly. |
||
===Under the hood=== |
===Under the hood=== |
||
| − | The DevKit is built from Funcom's modified version of Unreal Engine 4. |
+ | The DevKit is built from Funcom's modified version of Unreal Engine 4.15.3. The main changes specific to the DevKit are: |
* The Conan devkit redirects reads/writes of assets/maps to the mod's folder on disk: |
* The Conan devkit redirects reads/writes of assets/maps to the mod's folder on disk: |
||
| Line 164: | Line 166: | ||
==Notes== |
==Notes== |
||
| − | * If you have any other active mods, it may crash your game. |
+ | * If you have any other active mods, it may crash your game. Remove them and unsubscribe and see if this helps. |
* If things do not seem to be working, reset your keybindings. |
* If things do not seem to be working, reset your keybindings. |
||
* When creating a character and spawning in the desert you may start a few meters above ground the first time.<ref>"TestLive Patch Notes: Combat (23.02.18) :: Conan Exiles Testlive feedback" (Now archived thread)</ref> |
* When creating a character and spawning in the desert you may start a few meters above ground the first time.<ref>"TestLive Patch Notes: Combat (23.02.18) :: Conan Exiles Testlive feedback" (Now archived thread)</ref> |
||
| − | * Suggested: You '''do not''' have to unsubscribe to mods unless removing them does not solve crashing the game when it starts the [[TestLive]] version of |
+ | * Suggested: You '''do not''' have to unsubscribe to mods unless removing them does not solve crashing the game when it starts the [[TestLive]] version of ''{{Gamename}}''. So make sure you do not have any active mods when switching from live to TestLive. |
* Automatic Downloading of Mods was originally planned to release as the 2018 Halloween event "Night of Lost Souls" ended (November 6).<ref>CE Main discord, archived reply from BiJay in locked channel. (Refer to moderators if needed.)</ref> |
* Automatic Downloading of Mods was originally planned to release as the 2018 Halloween event "Night of Lost Souls" ended (November 6).<ref>CE Main discord, archived reply from BiJay in locked channel. (Refer to moderators if needed.)</ref> |
||
* Referencing data from other modded tables is currently not implemented.<ref>[https://discordapp.com/channels/271779596670730240/271779596670730240/530848364108054528 Robtheswede#1110, CE Modding discord - January 4, 2019]</ref> |
* Referencing data from other modded tables is currently not implemented.<ref>[https://discordapp.com/channels/271779596670730240/271779596670730240/530848364108054528 Robtheswede#1110, CE Modding discord - January 4, 2019]</ref> |
||
| Line 182: | Line 184: | ||
[[Category:Modding| ]] |
[[Category:Modding| ]] |
||
[[Category:Guides]] |
[[Category:Guides]] |
||
| + | |||
| + | [[pt-br:Modificação (Mods)]] |
||
| + | [[zh:模组]] |
||
Latest revision as of 15:38, 6 May 2021
- See also: Guide#Modding, Modding/Useful links.
- See also - mods: Mod:Age of Calamitous, Mod:Emberlight, Mod:WARRIOR Mutator for Conan Exiles.
Conan Exiles features full modding support on PC. This was made available at the start of Early Access. Mod developers are able to download a custom Unreal Engine editor, letting them create a whole host of modifications to the game. Everything from changing aspects of gameplay to adding new monsters and items to the game can be done with the modding tools. A mod management tool which connects to the Steam Workshop allows players to easily load in the mods they want to play with.[1]
Mods for Conan Exiles
The mod DevKit is a work in progress and there are many rough edges still. (This also goes for the documentation!) Some things to be aware of:
- You have to restart it when you want to work on a new mod. (This might not get fixed any time soon, since flushing / reloading assets seems problematic.)
- Renaming mods is not trivial, so choose good unique names.
- The feedback for users when joining a server that has mods is very bare bones right now. It currently requires people to look for the mods manually, but this will be improved.
We will be focusing on fixing these issues and generally improving the modding experience over the coming weeks. Thanks for your patience!
Mods - Short Version
A mod in Conan Exiles is a single .pak (archive) file containing modified versions of game assets and optionally new assets.
To create mods, get the DevKit from the Epic Games Launcher, do your changes and build the mod to generate a mod file. You can either distribute the mod through the Steam Workshop by uploading it from the DevKit, or simply share the file with your friends directly.
Installing Mods
The easiest way to install mods is to subscribe to them on the Steam Workshop. Once they are downloaded you can find them in the "Mods" menu from the Main Menu in-game. You can also use mods that you get outside of the Steam Workshop - put the mod .pak file in "<SteamLibrary>\steamapps\common\Conan Exiles\ConanSandbox\Mods" and it will be available in the in-game mods menu.
Note: You have to restart the game before changes to the selected mod list has any effect. The ingame gui doesn't make this very clear right now.
Downloading Mods
Downloading mods may be done either automatically or manually.
Automatic Downloading of Mods
| “ | This is a quality of life fix that we have wanted to add for a while. Much requested by modders, this allows people a smoother gateway into the experiences created by our amazing community. | „ |
| ~ Dev Blog[2] |
The simple version: Automatic downloading of mods allows you to join a server without having to find and subscribe to every mod first.
The full explanation: When you join a modded server without having subscribed to their mods first, the game will give you a list of which mods you are not subscribed to with an option at the bottom to download and enable all missing mods. Bear in mind doing so will require the game to restart and the game takes a long time to start up if you're using a lot of mods.
Non-Steam mods are shown in the list, but you will have to get their correct version manually.[3]
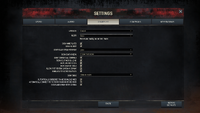
There are also two checkboxes, one to automatically subscribe to / update mods when needed and one to automatically connect when ready. These may be changed from Settings > Gameplay:[4][5]
The two bottom settings toggle the Automatic Downloading of Mods' aspects.

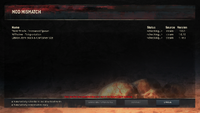
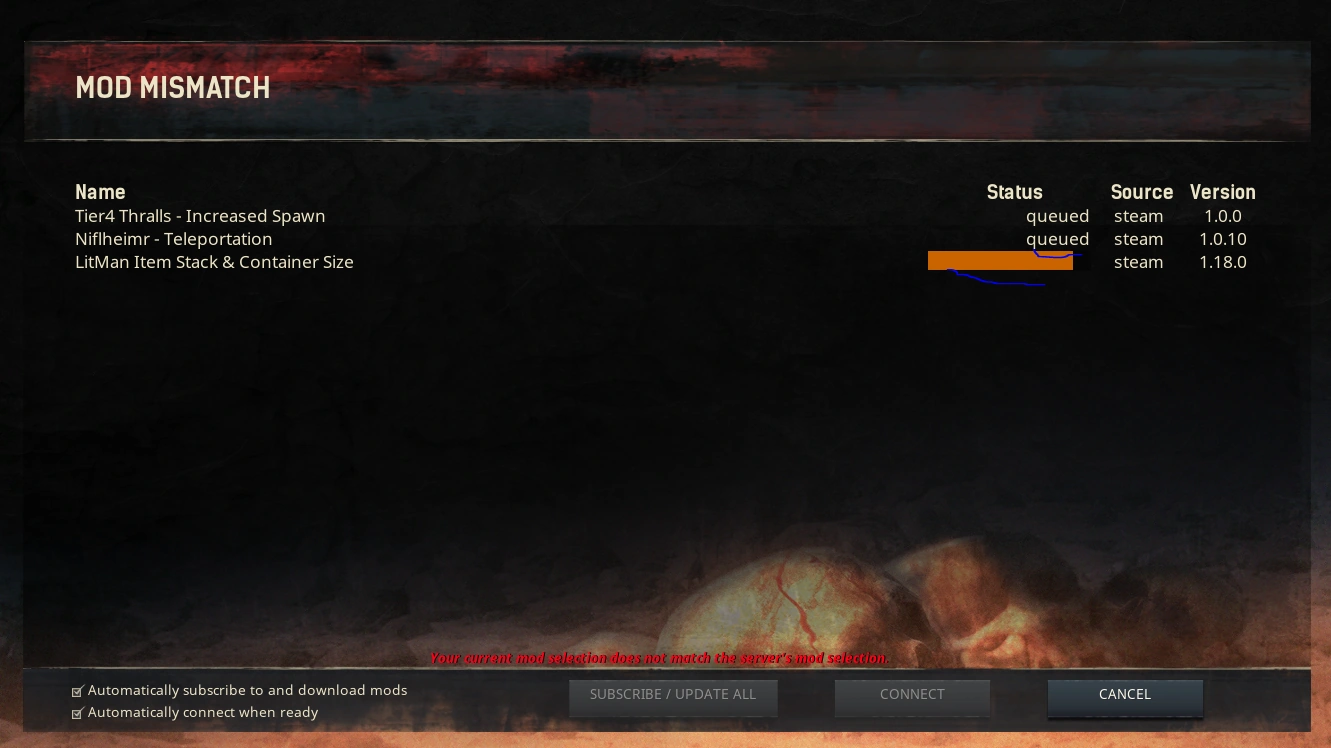
Mod Mismatch section seen when selecting a server on the server list.
The Mod Mismatch screen displays unsubscribed mods.

Status bars indicate the downloading progress of each mod.
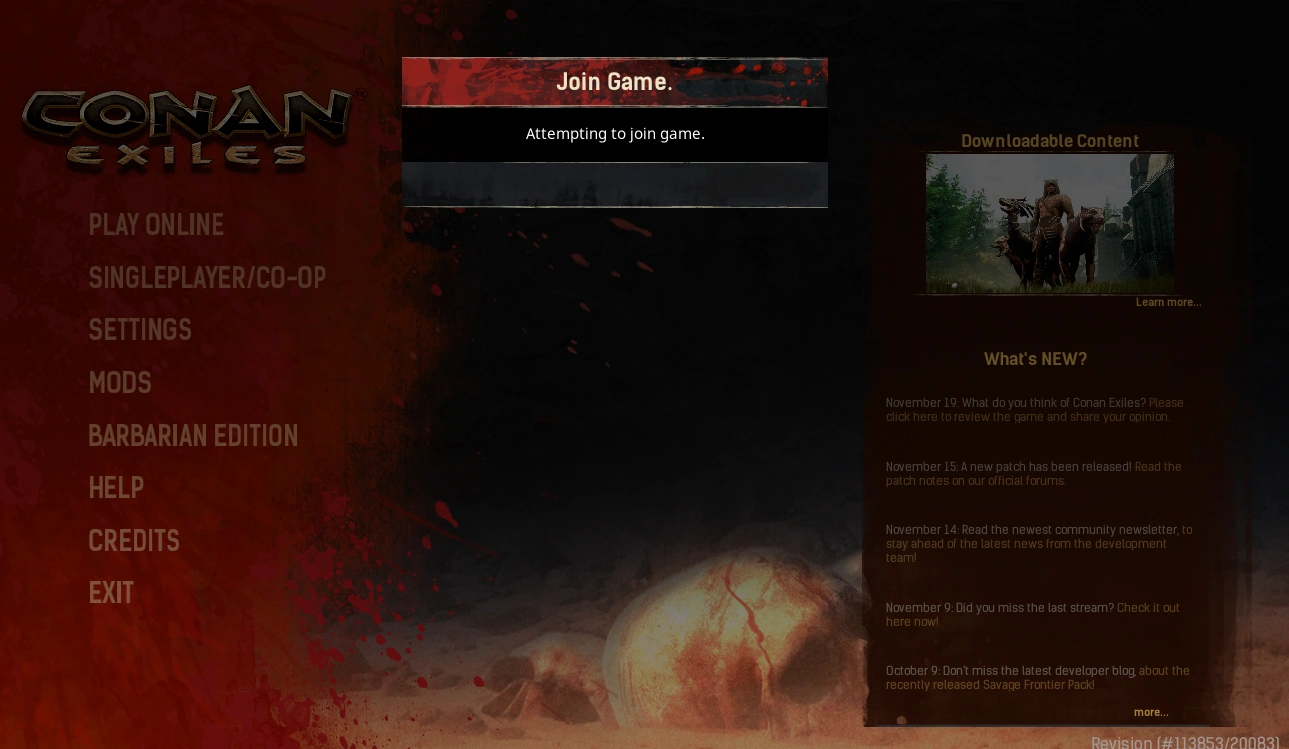
The game restarts, which saves and auto-joins the selected server.
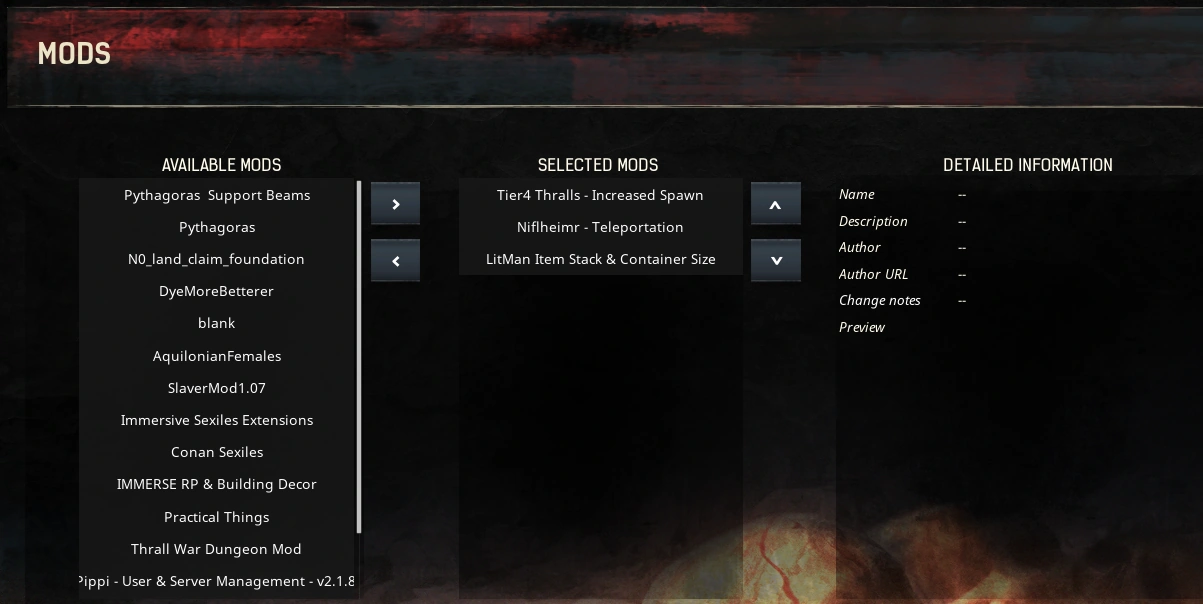
The Mod screen is used to select mods to play with.

Manual Downloading of Mods
Clientside: To join a server with mods, you must first have the same mods the server is running, with the same load order. When joining a server, you will get a message box telling you which mods you are missing. You cannot connect to the server unless you have those mods installed and activated.
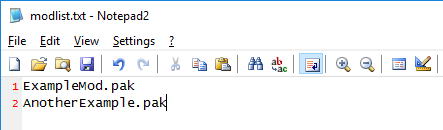
Serverside: To start a server with mods, you put the mod files (<mod name>.pak) in "<dedicated server folder>/ConanSandbox/Mods/" and add a text file with the file names of those .pak files, one per line, like this:
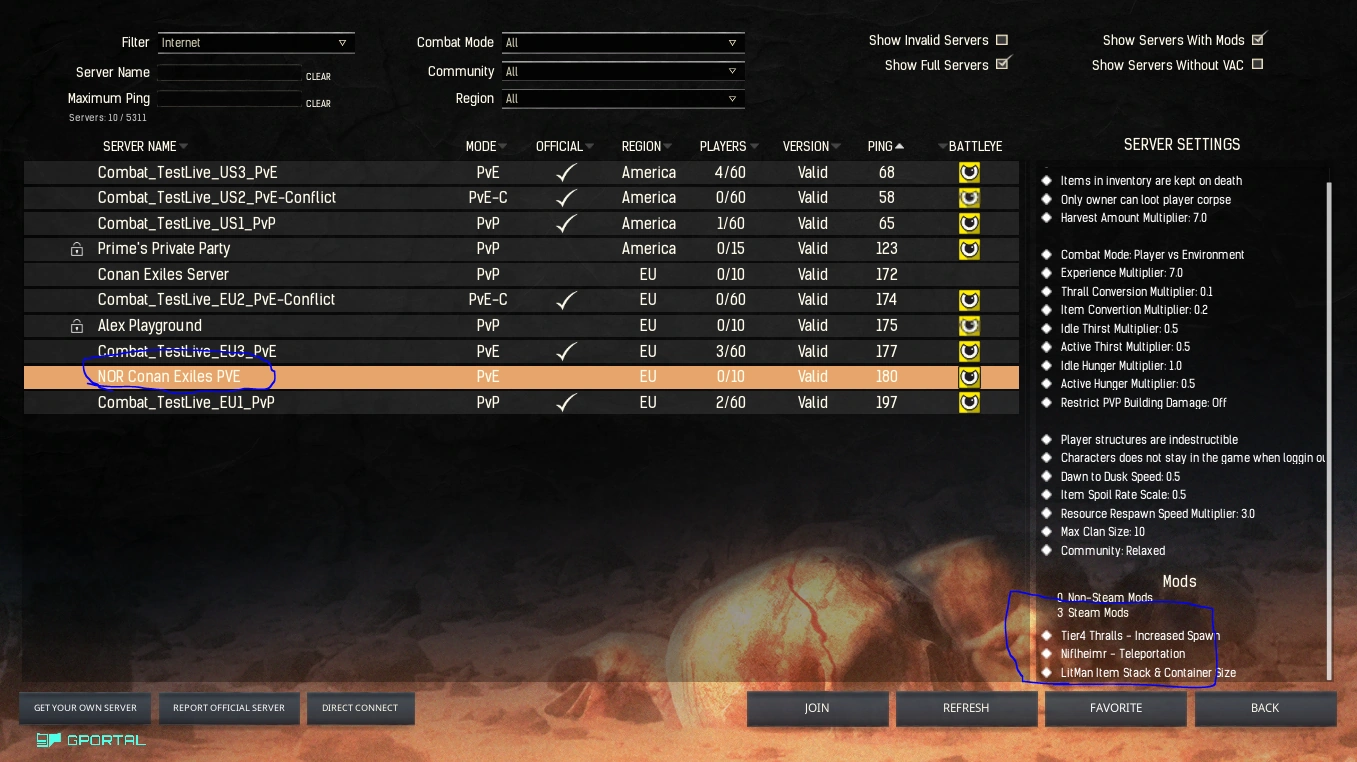
Instead of creating modlist.txt manually you can also select the mods you want in your game client, then copy the file from "<game folder>/ConanSandbox/Mods/modlist.txt" to "<dedicated server folder>/ConanSandbox/Mods/modlist.txt". When clients try to connect to the server, the game will first check to make sure the clients have the same mods as the server selected. If they don't they won't be able to connect.
Mod compatibility
Mod compatibility depends on the nature of code changes done in patches. Players and server admins who use mods may experience compatibility issues when trying to play the game immediately after a new patch. These can be anything from not being able to access a chosen server to placeables disappearing and the game crashing on start-up. It could even result in world corruption! To be safe, don't launch your server until you've updated every mod possible and/or tried them in singleplayer, where it's not so much of an issue if the world gets corrupted.
To fix these compatibility issues the developers have to release a new DevKit so the mod creators can update their mods. They try to have a new DevKit ready as quickly as they can after rolling out a patch and they are usually able to release it no later than 24 hours after the patch came out. Having a DevKit ready when a patch is fresh causes less downtime for modded servers and players.
Since the developers cannot always guarantee that existing mods will be compatible with a new version of the game, they are recommending that you disable mods if you encounter an issue right after a patch has gone out. That way you can confirm that an issue is caused by an incompatible mod or if it is a bug that they have to patch.
DevKit
You can get the DevKit (~270 GB) itself from either the
- Epic Games Store (has to be reverted to the UE version Conan Exiles is on.)
- Epic Games Launcher (~8 GB), by either
- Downloading it directly from their site.
- "Purchasing" it (it's free) with an Epic Games account and installing it from the store.
Once purchased from the website links above, it will be in the game library, which is hidden by default. Go to settings and uncheck hide game library to find it.
- WARNING: install the DevKit with the shortest possible path to prevent future build failures. In other words, prefer
C:/ConanExilesDevKitoverC:/Program Files (x86)/MyStuff/Games/ConanExiles/ConanExilesDevKit.
Finally, run the DevKit under the "Modding" tab. The DevKit is a modified version of the Unreal Engine editor and will let you do (almost) everything the developers can do except C++ code changes.
Support
Usage
The first time you launch the DevKit it will open with a default mod selected. You can use this to play around and see how things work, but before you start working on something you want to use or distribute to other people, you'll need to create a new mod with a unique name. See Create new mod below for more details.
Note: The folders in "<DevKit folder>/Games/ConanSandbox/Mods/" are used by the DevKit to edit the mod, so deleting a folder here means you can no longer edit that mod. These are the folders you want to have backups of!
Editing existing game assets: Modify assets normally. Note that you can't rename, move, or delete default game assets.
To create new assets: New assets can only be added in "Content/Mods/<mod name>."
Use "Play in current viewport" to test with the mod content loaded without having to wait for the game itself to load.
Build errors
When building a mod, Unreal will "cook" each asset. This process will fail if the assets contains certain errors (like a Blueprint compiler error). If the build fails, check the output log for the lines saying something like this (should be near the bottom):
LogModManager: LogInit: Display: Failure - 7 error(s), 10 warning(s)
LogModManager: ModCook completed with code 1
LogModManager:Error: Error cooking. Cook process returned: 1
In this example there are 7 errors that caused the build to fail. The log will say what the errors were in more detail further up. Fix these and try to build again!
Sharing mods
When you have a mod you want to share with others, you must first build the mod. Then you can either upload the mod to the Steam Workshop or share the generated .pak file directly with your friends.
- Select active mod: Switch which mod you are currently editing. This will restart the editor!
- Create new mod: Use this to .. create a new mod.
- The name you enter here will be used to create a folder: <DevKit folder>/Games/ConanSandbox/Content/Mods/<mod name>.
- Any assets you add will end up here, so make sure you choose a unique name to avoid conflicts with other mods. (Especially until we figure out a safe way to rename mods >.<) (Suggestion by Carnaxus: "Save As" funciton?)
- You can change the display name of the mod to something more user friendly before building/uploading to Steam, aka if you named your work in progress "bossweaken," you can rename it to show up as "Weaker Bosses" on the Workshop.
DevKit window
- Name: Name of mod as it appears in the in-game mod menu and in the Steam Workshop.
- The name can't be empty and must be less than 128 characters long.
- Author: Name shown as author in the in-game mod menu.
- Author URL: Shown in the in-game mod menu.
- Version major, minor, build: Show in the in-game mod menu. Please don't go crazy, we don't need to know that your mod is currently in version 0.2.5.rv2.beta.test3.
- Description: Shown in the in-game mod menu and on the Steam Workshop. Max length is 8000 characters.
- Change notes: Shown in Change Notes on the Steam Workshop page.
- Preview image: A .png image that must be less than 1MB. Used on the Steam Workshop page. Not necessarily required, but your mod will probably be ignored without at least one image.
- Build mod: This will cook the mod and package it so it can be used/uploaded to Steam. Building can take a while depending on how complex your mod is (possibly even an hour or longer, welcome to the world of programming)
- The generated .pak file is the only file needed to load the mod. You can share this with and/or without Steam.
- Open in File Explorer (or whatever your equivalent is):
- Active mod folder: Opens the local folder of the active mod that the DevKit uses when editing the mod.
- Built mod folder: Opens the folder where the .pak file generated from a build is located.
- Cook by the book: By default, the DevKit will find and cook each asset modified in the currently active mod individually. If "Cook by the book" is checked, it will do a full dependency based cook (but force include all new assets added by the mod) and then pack up cooked versions of the mod's assets. The normal cook will almost always be much faster.
- Steam file ID: The Steam Workshop item ID used to identify the mod in the Workshop.
- This is automatically managed when uploading to Steam.
- Open workshop page: Opens a browser window with the Workshop page of the current mod. It might take a few seconds before the page is updated after uploading. It also might open in Steam instead.
- Steam visibility: Visibility of the mod in the Steam Workshop.
- Public: Visible to everyone.
- Friends-only: Visible to you, your friends and Steam admins.
- Hidden: Visible to you, Steam admins and users marked as creator.
- Unlisted: Visible to you but does not show up in search results. Requires you to send a direct link to anyone you want to be able to use the mod.
- Upload to Steam button: Uploads the current mod to Steam. You must first have a build of the mod.
- Update mod info to Steam button: This will only update the info on the Steam page for your mod with the current state of all the textboxes and preview image. Allows you to update the preview image on Steam and Steam visibility without uploading the whole mod.
Steam
You can upload a mod to Steam through the DevKit so others can subscribe to the mod. Note that changes made to the mod on the Steam Workshop website will NOT be reflected in the DevKit. This means that changes to name, description, visibility or preview image will be overridden the next time you upload your mod from the DevKit, so make sure you update these field only through the DevKit, or make sure you mirror such changes manually. Changes to the other fields will not be affected.
Creating an example mod
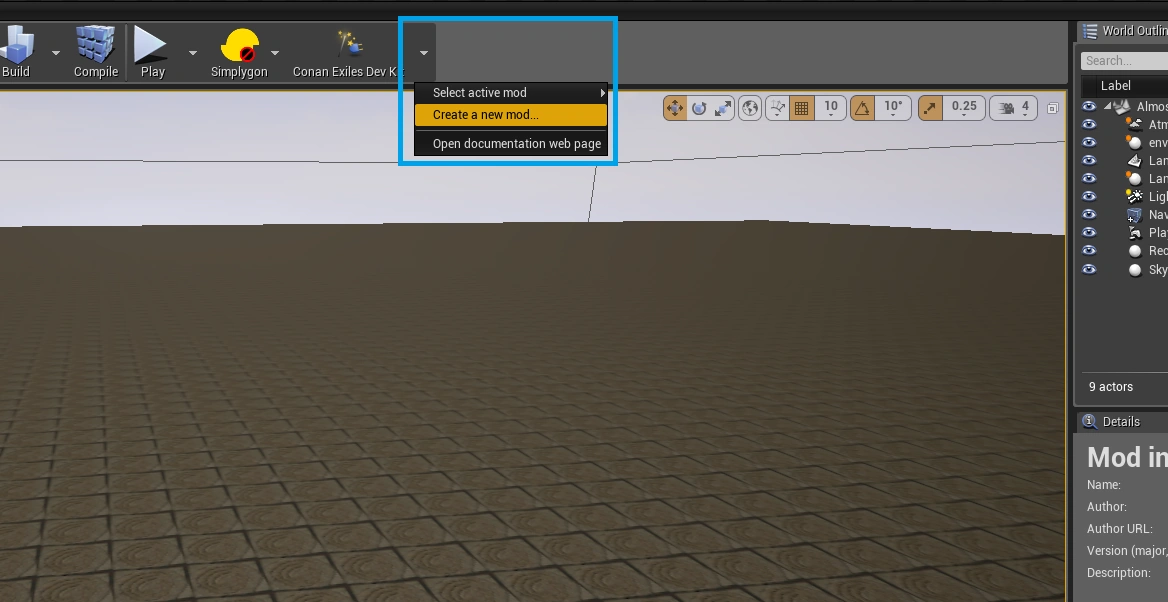
- Open the DevKit and go to the DevKit drop down menu. Select "Create a new mod..." and you will be asked to enter a name for the mod:

Create new mod
- Enter a name and click "Create." Once the editor has restarted you can begin creating the mod.
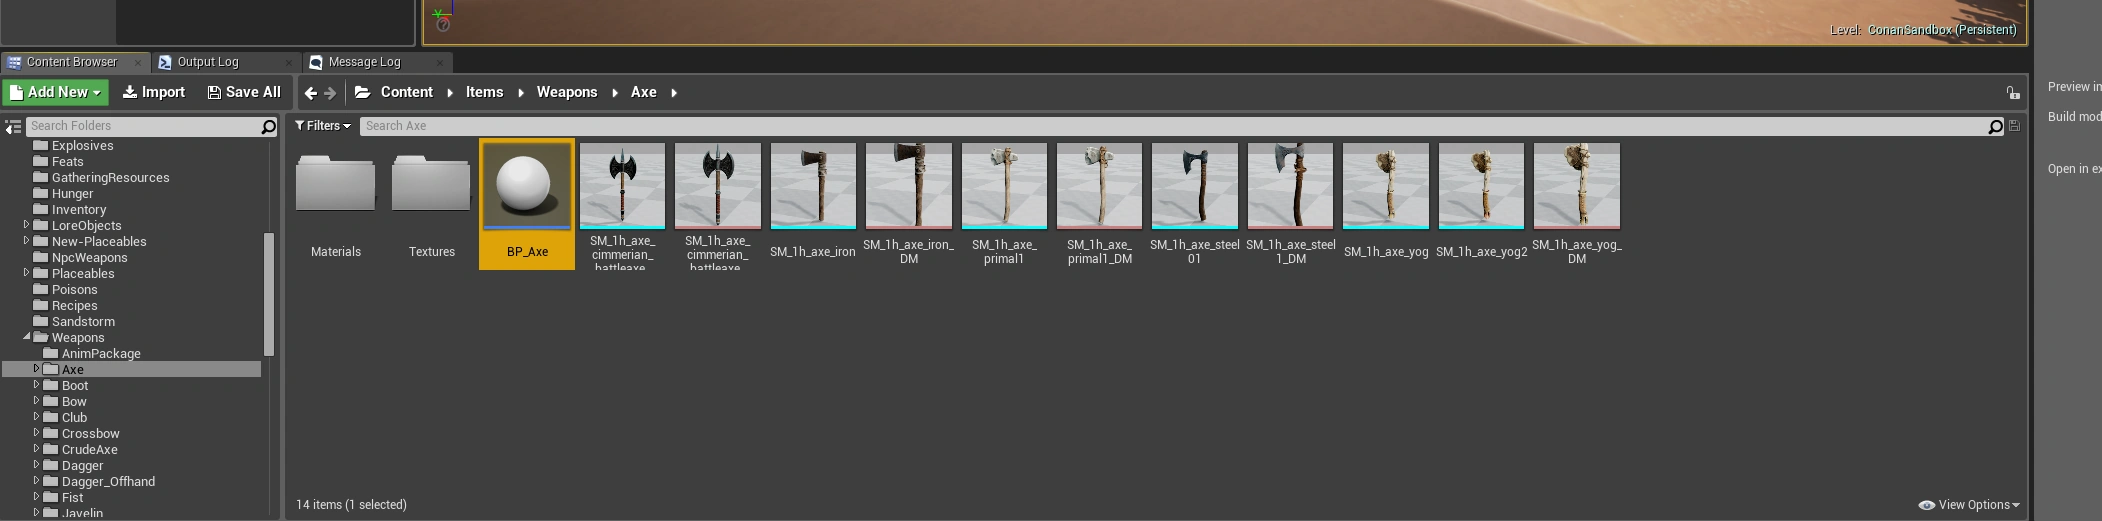
- For this tutorial, we'll open "BP_Axe" In the content folder Items/Weapons/Axe:

Edit Items/Weapons/BP_Axe
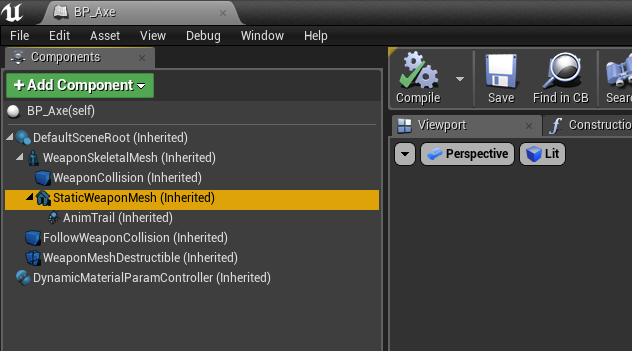
- Select the "StaticWeaponMesh" in the Components window:
Select StaticWeaponMesh
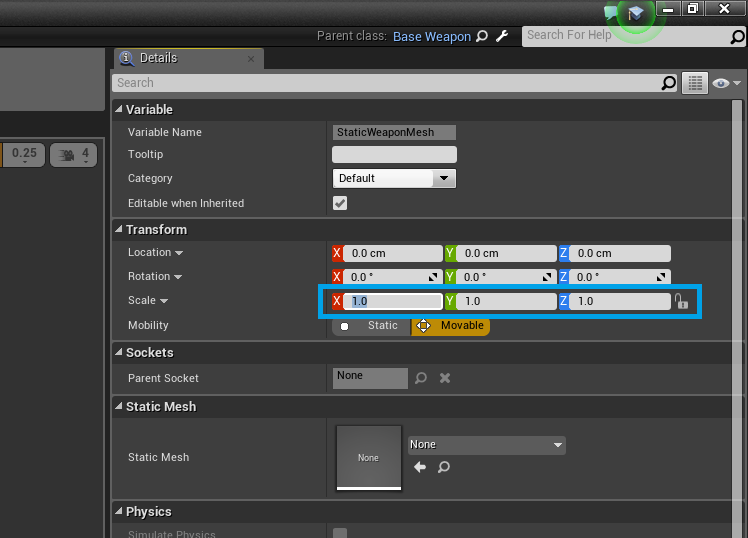
- Change the values of the Scale property of the Transform in the Details window:
Change the scale properties
- Hit "Compile" and "Save" for that Blueprint. Repeat for whatever other items you feel like changing (like "Items/Weapons/Torch," "Items/Weapons/RepairHammer," "tems/Weapons/Pickaxe," etc.).
- To test your mod you can use "Play" from the main window:
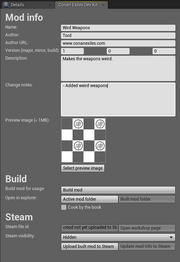
- Once you are done with your mod, go to the DevKit panel. See the "DevKit window" section for details on the different fields and buttons:
Go to DevKit panel
- Enter the details and select a preview image:
- Click the "Build mod" button to build the mod. This process can take a while depending on how many assets are changed in the mod.
- Once the build is done, you can either click "Upload mod to Steam" or go to the "Built mod folder" and share the "<modname>.pak" file directly.


Under the hood
The DevKit is built from Funcom's modified version of Unreal Engine 4.15.3. The main changes specific to the DevKit are:
- The Conan devkit redirects reads/writes of assets/maps to the mod's folder on disk:
- Reads/writes in "<content>/Mods/<active mod name>/*" are remapped to "<content>/Mods/<active mod name>/Local/*"
- Reads/writes anywhere else in "<content>/Mods/*" are blocked.
- Reads/writes anywhere else under /Content are redirected to "<content>/Mods/<active mod name>/Content," with reads falling back to the original path if nothing is found in the mod.
- It tries to prevent adding/moving/deleting/renaming anything outside "/Content/Mods/<active mod name>/"
- It prevents opening or exporting assets Funcom bought from the marketplace (for licensing reasons).
- It adds the DevKit toolbar button and menu.
Notes
- If you have any other active mods, it may crash your game. Remove them and unsubscribe and see if this helps.
- If things do not seem to be working, reset your keybindings.
- When creating a character and spawning in the desert you may start a few meters above ground the first time.[6]
- Suggested: You do not have to unsubscribe to mods unless removing them does not solve crashing the game when it starts the TestLive version of Conan Exiles. So make sure you do not have any active mods when switching from live to TestLive.
- Automatic Downloading of Mods was originally planned to release as the 2018 Halloween event "Night of Lost Souls" ended (November 6).[7]
- Referencing data from other modded tables is currently not implemented.[8]
- There are currently no plans to bring mods to consoles.[9]
Media
- Stream: UnrealEngine, Andy Benditt - November 23, 2016][10]
- Announcement: "Conan Exiles Mod Editor - Feb 16th - Live From Epic HQ!" Alexander Paschall, Unreal Engine Forums - February 15, 2017
References
- ↑ Dev Blog 8
- ↑ "A look back and the way forward" Jens_Erik, Funcom Forums - June 6, 2018
- ↑ Vodi#3191, CE Modding discord - November 28, 2018
- ↑ "Auto download of Mods" stinger, Funcom Forums - November 23, 2018; ADoM settings found in TestLive.
- ↑ CE Modding discord (in #general) - November 23, 2018
- ↑ "TestLive Patch Notes: Combat (23.02.18) :: Conan Exiles Testlive feedback" (Now archived thread)
- ↑ CE Main discord, archived reply from BiJay in locked channel. (Refer to moderators if needed.)
- ↑ Robtheswede#1110, CE Modding discord - January 4, 2019
- ↑ Instagram - February 14, 2020
- ↑ "Dev Blog 13: Make your own mods in Conan Exiles" the dev team, Site - February 24, 2017