| Modding/Useful links | |
|---|---|
| Levels: | Modding |
| Author: | Robtheswede |
- See also: Guide, Useful links.
A list of useful links for modding related guides and useful links.
General
- Community members have set up a modding discord. Please read the rules when you join!
- This is a link to all guides maintained by Robtheswede (DevKit developer).
Most of these are not yet documented on the wiki, but are listed on the Guide page. Feel free to contribute them!
- Created to replace and solve some problems with Conan Exiles in-game mod options
Unreal Engine
- Unreal Engine - Jorge Israel Peña, Blaenk.Denum
- 'Unreal Engine 4' Network Compendium - Cedric 'eXi' Neukirchen, Salty Panda Studios
- Mathew Wadstein, YouTube
- Blueprints - UE Docs
- Substance painter and UE4
Tools
- CEUnrealPakMITM.zip by Joshtech.
- Compresses pak files on cook.
- If all is correct you should get something like this in your output:
- "##Hi, Joshtech here. Just going to step in and perform magic on this pak file. kk thx##"
- AssetTester.zip by Joshtech.
- Allows for bulk scanning of mod pak files to gather which funcom assets they "touch".
- An example of its use would be to place the executable and UnrealPak.exe in your workshop directory.
- All scans are recorded within a timestamped output log.
- An excellent sharing of blueprint utility for UE
- Blueprint: movable widget code by Dragoonduneman (Part 1 - Part 2 - Part 3)
- Blueprint: Fluid filling object by Dragoonduneman. (No mesh editing required)
- BP_MoveableMenu.uasset by dougy
- Asset for draggable UI.
I created a new Widget, and set it up so the root and canvaspanel were visible, and created 3 borders that were variables. On each of the borders I binded an event to On Mouse Down and all it did was get the drag offset and set value of a variable I made called "Currently Dragging" which was a reference to a content widget. Here's an example of what the event bind looks like:
https://gyazo.com/59e443cb6613de1ec41e368e1ffd6daa
Then, in the actual widget blueprint I created 2 overrides: On Mouse Move and OnMouseButtonUp (buttonup can technically can be optional). Here's how I set them up:
https://gyazo.com/2db13bf2033e4a1999e0a0c63a5bc426
https://gyazo.com/6dd476cab3661ec3f182d1f737373003
Final result is this:
There's other ways to do it too that are probably more efficient. In a mouse button down override you can detect a drag event and then in OnDragDetected override create a drag & drop operation and use a payload.- To determine if an item is a child of a class based on the ItemTable.
- LibreOffice DataTableExporter by Robtheswede.
- A spreadsheet tool for easy editing of the ItemTable and RecipesTable.
- ConanExilesDataTableParser by FiftyTifty.
- A program which allows you to automate replacing item ID's for a recipe's ingredients.
- ConanMaskingGroup by WaffleButter.
- A smart material for substance painter to help with tint masking. It adds colors so that you don't need to change the viewport channel to see your user masks. Before exporting your maps, move it to the bottom of your layer stack so that the colors don't bleed into your maps.
- The Blood .PNG file used internally to apply blood to weapons.
- (An empty Warpaint Icon) by Corintio.
- CharEditLite by Mechani.
- If you want to use high IDs (this must be number) for hair and colors, you can use this or mod the character creation.
- The character creation seems to count the number of rows in the datatable and use an ID incremented from 0 to that number. This needs to be changed to read the real available IDs.
- The sources (GitHub) use an Apache license and can be used as long as you mention the original work, the author and agree that your use of the sources is your sole responsibility.
EZee_AP
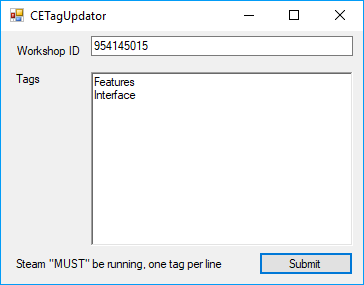
CETagUpdator interface.
- Can be used to update steam tags.

TempTool interface.
- Calculates the colours used for the temp of the map's TemperatureHeatMap.
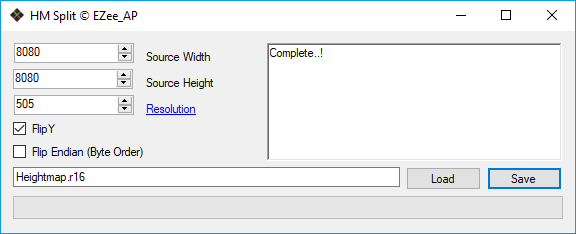
HM Split interface.
- For "cutting" a big heightmap into tiles to be loaded with world composition.
(file should be .r16 format, resolution is the outputted tile sizes)
- Simple LevelProp with custom interaction and its own "Floating Info" widget, including the RPC example from the wiki.
- InstanceMeshTool.zip (BLU InstanceTool)
Small tool for level creators, tool can be used to generate instanced meshes from static meshes in the editor, tool respects mesh scale and materials, if you have 2 of the same mesh using different materials they will be counted as 2 individual unique meshes.
- Highlight all the static meshes you want converted into instanced meshes in the editor viewport.
- Open "BLU_InstanceTool" and press "Unique Mesh Count", this will output the number of instance actors to add to the level.
- Highlight all the static meshes and the instance actors in the editor viewport.
- Open "BLU_InstanceTool" and press "Make *TYPE* Instances".
- Delete your static meshes.
- Before using the tool make sure to backup your level as a safeguard.
- It is not optimised. It is only for use in the editor and it seems to work well so far.
- Includes 4 example widgets and 3 UI components.
- User Widget, this widget saves data to a .sav file on the client PC (also has option to delete the data from client PC).
- Admin Widget, this widget saves data to the database on the server.
- MultiUser Widget, has user and admin options, user options are saved to .sav, admin options are saved to database on the server.
- Save To Player Widget, this widgets saves data to an actor component added to BasePlayerChar so you can save player specific data.


Workshop Uploader interface.
Includes 5 features which make uploading to the workshop easier.
Features=
- Uploads new/updates workshop items
- Mod Tags
- Can inject WorkshopID into modinfo.json inside the pak file (needed for mod auto downloader, the devkit will do this the first time you upload via the devkit, when pak is rebuilt it does not use compression)
- Compress pak files
- Test integrity of pak file (when running IsConanExiles can highlight default content in blue depending on settings.json)
There is a simple settings.json file in the dir, read the ReadMe.txt file for usage (read that file anyway), app not necessarily limited to Conan Exiles, although tags options will be removed when running without "IsConanExiles".
In the "file" menu you can save/load all the app data for each mod, some features (compression/test/inject id) require you to copy UnrealPak from "Devkit\Engine\Binaries\Win64\UnrealPak.exe" to the application directory. Think of it as CETagUpdater v2.- Unzip and drop in your local folder. All the magic happens in the construction script, but you can use the code in normal event graph etc.
- Scripts can also be used to change colors that are not normally changeable with dyes.
Guides
- Setting up UE4 Conan DevKit to use Git on Win10 v1 PDF by Bumble.
- CE Dev Kit Tutorial - Mask Layers PDF by Dr.Nash.
- Creating Clothing in CE PDF by Wulfhere.
- Clothing Primer PDF by Ephraim.
- Custom Armor Easy Mode by Darmok.
- Custom Bows using Conan Exiles Dev Kit by VALR.
- Conan Exile Mod - Doorbell Example by EZee_AP (Michael Craig)
- Works with doors / gates. (Doorbell.zip)
- DevKit Tutorial Vol. 1 playlist by RingerVulpe.
- Tuto FR playlist by swefpifh (FR)
- Designing Blueprints the proper way in UE4 by Raymond Cripps
- UE4 quick tutorial: Custom collision from Blender by Alen Loeb.
- Reflective Modding Documentation by Ephraim.
- For anyone starting to go for fully custom models on their mod, this might help to gain some prior experience on the matter.
- UE4 tips: texture offset, rotate, mirror and tilling
- Nvidia Apex - Clothing Tutorial: From Maya to Unreal by Jessica Kamstra.
- Nvidia Apex - Cloth simulation by Golaem.
- Setting up character volumes.
- Maya - Apex workflow by Ephraim.
- An additional view on the whole armor creation process. Focused on Apex in Maya.
- Translation How To (v1.2) by Senja.
Death2Mongo (DeadlyMidnight)
Pulled from this playlist.
- Part 1: Setting up your first mod
- Part 2: Making a placeable
- Part 3: Events and functions
- Advanced: Creating The Sharables Mod (Example)
HellsSauna (Hellsbreath)
Pulled from this playlist.
- Basics
- DataTables (and a compass)
- How to create swimmable / drinkable water
- Spawning NPCs
- Editing Asset
- Saving to a Database (Creating a MOTD)
- /broadcast from the chat text box
- Encumbrance
- Placeables (Making a door)
JustHorse
Tips n' Tricks

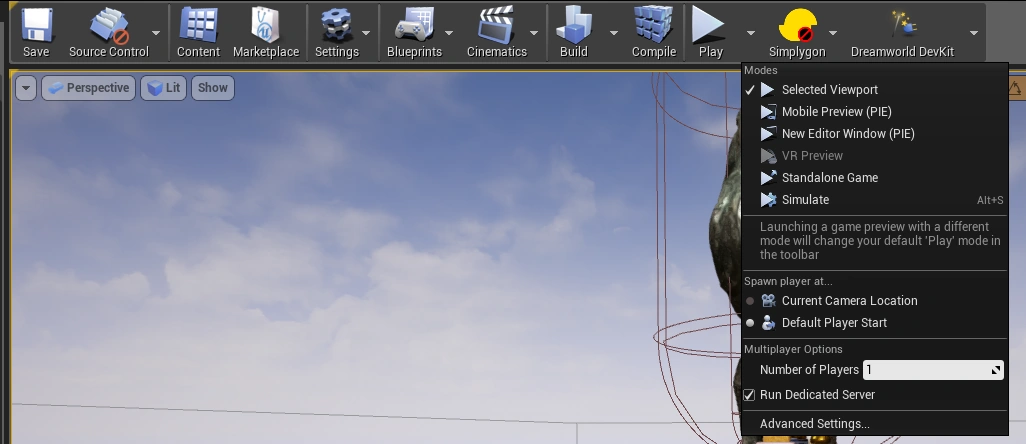
Click the little button beside Play and tick Run Dedicated Server.
Increase the number of clients if you want to see it from two perspectives.
- If you want to test mods in multiplayer you can click the little button beside Play and tick Run Dedicated Server, And increase the number of clients if you want to see it from two perspectives.[1]
- Use idle animation to help you position armor pieces.[2]
- For anyone doing maps - if you're placing Skeletal meshes out, you really should click this checkbox, otherwise your SK's will tick quite a lot.
- You can use the console command
SetServerSetting LogoutCharactersRemainInTheWorld 0to start from wherever you do "play from here" (in case you always start in the last-logout place when running the game from the editor) - DLC Item-Ranges